Cross posted with this_ Project Atomic Blog post
---
With the latest release of Fedora Atomic Host we are now live in DigitalOcean! This was a popular user request and thanks to the folks at DigitalOcean and the Fedora Atomic Working Group we now have Fedora Atomic Host as an option when creating a droplet. Go ahead and spin up a droplet in the web interface or via the doctl CLI today!
Important Notes
A few things to note:
- Usually Fedora Atomic images have you log in as user fedora. But, as with other DigitalOcean images, log into the Fedora 25 DigitalOcean cloud image with your ssh key as the root user.
- In these images there's no firewall on by default. There's also no cloud provided firewall solution. We recommend that you secure your system immediately after you log in.
- Fedora Atomic Host should be available in all datacenters across the globe.
- If you have a problem with these images then drop us an email at atomic-devel@projectatomic.io, or ping us in #atomic on Freenode.
Preparing to Launch a Droplet
In order to secure our system let's create some user-data that will instruct cloud-init to enable the default system firewall on bringup. This default firewall basically blocks everything but ssh:
#cloud-config
bootcmd:
  - systemctl enable iptables --now
Getting Started with the Web UI
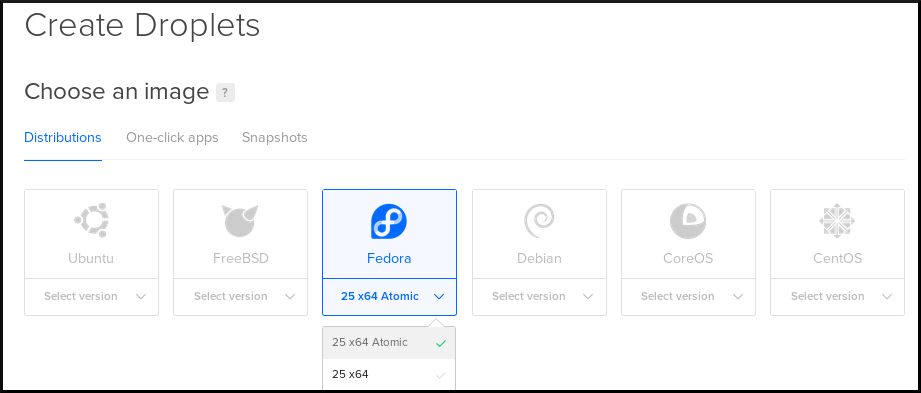
You can create a Fedora 25 Atomic instance just like you can any other droplet within DigitalOcean. On the Create Droplets page we can select 25 x64 Atomic:
Then, after selecting size and region, we can populate the user-data in the Select additional options section:

After that we can go ahead and create the Droplet. Once it is up and running we have a nice little status that shows us the IP address of the machine:

And finally we should be able to access our droplet:
$ ssh root@162.243.26.249
Warning: Permanently added '162.243.26.249' (ECDSA) to the list of known hosts.
[root@fedora-2gb-nyc2-01 ~]#
[root@fedora-2gb-nyc2-01 ~]# rpm-ostree status
State: idle
Deployments:
● fedora-atomic:fedora-atomic/25/x86_64/docker-host
             Version: 25.113 (2017-04-25 01:47:29)
              Commit: 3492546bc1ef6bca1bc7801ed6bb0414f90cc96668e067996dba3dee0d83e6c3
              OSName: fedora-atomic
Getting Started with the CLI
In addition to the Web UI, DigitalOcean has provided a tool for managing droplets from the command line, known as doctl. You can grab the doctl binary from the releases page on GitHub and interact with the API. In order to do this you need to generate an API token. One way to use this token is by setting the DIGITALOCEAN_ACCESS_TOKEN environment variable to the value of the token.
Note DigitalOcean has provided a full tutorial on using doctl here.
First we'll set the access token and retrieve the fingerprint for our ssh key we use within DigitalOcean:
$ export DIGITALOCEAN_ACCESS_TOKEN=xxxxxxxxxxxxxxxxxxxxxxxxxxxxxxxxxxxxxxxxxxxxxxxxxxxxxxxxxxxxxxxx
    $ doctl compute ssh-key list
    ID       Name     FingerPrint
    84000    Ocean    xx:xx:xx:xx:xx:xx:xx:xx:xx:xx:xx:xx:xx:xx:xx:xx
Next we'll create a file with the contents of the user-data we determined in the previous section:
$ cat <<EOF > ./user-data.txt
#cloud-config
bootcmd:
  - systemctl enable iptables --now
EOF
Now we can spin up the droplet based off the fedora-25-x64-atomic image. We'll name it atomicdroplet:
$ doctl compute droplet create --image fedora-25-x64-atomic --region nyc3 --size 4gb --ssh-keys xx:xx:xx:xx:xx:xx:xx:xx:xx:xx:xx:xx:xx:xx:xx:xx --user-data-file ./user-data.txt atomicdroplet
    ID          Name             Public IPv4    Private IPv4    Public IPv6    Memory    VCPUs    Disk    Region    Image                   Status    Tags
    47047971    atomicdroplet                                                  4096      2        60      nyc3      Fedora 25 x64 Atomic    new
Next we'll query the API again to see the status and to see what the IP address is set to:
$ doctl compute droplet list
ID          Name             Public IPv4       Private IPv4    Public IPv6    Memory    VCPUs    Disk    Region    Image                   Status    Tags
47047971    atomicdroplet    159.203.94.102                                   4096      2        60      nyc3      Fedora 25 x64 Atomic    active
And on to accessing the droplet:
$ ssh root@159.203.94.102
[root@atomicdroplet ~]# rpm-ostree status
State: idle
Deployments:
● fedora-atomic:fedora-atomic/25/x86_64/docker-host
                         Version: 25.113 (2017-04-25 01:47:29)
                          Commit: 3492546bc1ef6bca1bc7801ed6bb0414f90cc96668e067996dba3dee0d83e6c3
                          OSName: fedora-atomic
And Beyond
Now that you have a Fedora Atomic Host droplet you can explore the world of containers by either running individual containers by hand or by utilizing a more advanced platform for container orchestration and life-cycle management. There are some docs on projectatomic.io which can help get you started.
Thanks
A special thanks to Ben Howard (@utlemming) from the DigitalOcean team as well as Lars Kellogg-Stedman (@larsks) from the Fedora Community for helping us find and fix many bugs in order to better support cloud-init static networking and ifcfg file support within NetworkManager.